Have you heard all the rage about bone broth? From Gwyneth Paltrow to Kobe Bryant, big-time celebs are hopping on the bone broth train. Not to mention, our guest this week helped Dwight Howard conquer sugar addiction. You’re about to learn how.
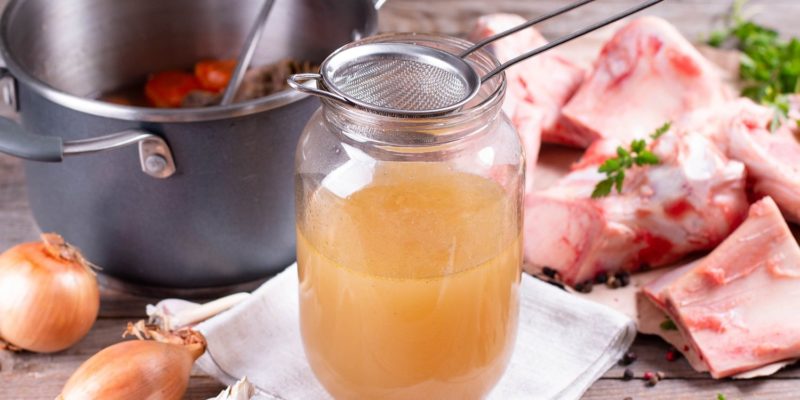
How to Make Beef Bone Broth!
Beef bone broth is harder to make than chicken bone broth, but it’s so rich and delicious, we think you’ll find it worth your time. When you reduce it down and drizzle it over steak, gravy style, the flavor is to die for!
Ingredients:
This article is continued below...(scroll down)


It helped. I feel great.
"It’s helped. I feel great."
Kobe Bryant
NBA baskeball player

This has been life changing
"Let me tell you this has been life-changing. I have all of her books, in audible and ebooks! I have gotten rid of all the hateful 8 oils. I have trained my body to eat its own previously toxic body fat. Download that pod it's a game changer!"
Megyn Kelly
Broadcaster / The Megyn Kelly Show

Life changing
Deep Nutrition changed my life.
Jesse Watters
Fox News Primetime host
Saved my life
I would like to thank you for literally saving my life. Back in February, I had to be hospitalized while on vacation in Phoenix with an A1C of 11% and had to start taking 2 types of insulin and 2 other meds. I read the Fatburn Fix in April, and followed the program to a tee, and I’m down by 15 pounds, 6.8 A1C, and only one once weekly diabetes medicine. Prior to reading the book, it was almost impossible for me to lose weight as a diabetic.
Leontyne Tompkins
I feel free
For the last month, I have really been reading all labels on everything. I have completely remove those 8 oils you talk about. I must tell you, I feel great! I have more energy and I am now 197 lbs (have always been around 205 to 210lbs). I eat potatoes with real butter, grass fed steak, pasta with the right toppings. I eat everything! I seem to crave less sugar. I love it!
Robert Kirkendall
I feel so much better
I had terrible aches and pains everywhere in my body, my hands, shoulders and knees. I feel so much better and the way I feel is motivating me every day! Thank you
Mike Deb Wootan Burcin
Better than ever
I am an anesthesiologist in Orlando and a huge fan of both of your books! I have been incorporating your principles for the last 10 months and feel that my health is better than ever.
Marnie Robinson, MD
My allergies disappeared
The biggest difference for me (and a surprising one) is that my allergies have almost completely disappeared! This is a big deal for me, because I’ve had allergies most of my life and they have often affected what I do which is a teaching music in [a public school district]. In general, I feel much better and have more consistent energy throughout the day.
Erica Turrell
Heart Palpitations have Stopped
I’ve lost 20+ pounds (also fasting 16-24 hours daily) and haven’t had palpitations except for one occasion — I had a mini bag of Fritos for the first time in July. And, I feel better now on a daily basis than I ever did all through college.
Mike Wright
Deep Nutrition and Fatburn Fix reader
I’ve lost over 50 pounds
I’ve lost over 50 pounds. I’m 56 years old. Cutting processed food and unhealthy fats from my diet was one of the first things I did on my health recovery journey...I went cold turkey off the bad oils. Emptied my pantry into the trash and just started eating real food
Mitzi Wilkinson Champion
Knowledge I didn’t know I needed
Your Fatburn Fix book is amazing, my friend. Thank you! I’m an Functional Nutritional Therapy Practitioner and I know my stuff. This is the extra layer of knowledge I didn’t know I needed. Well done!
Jennifer Dillman
Fatburn Fix reader
Lost a solid 20 lbs and my bloodwork is great
I have lost a solid 20 lbs and my bloodwork (after 3 months of eating your way) was even better! I was metabolically healthy (per your book) before I read your book, but barely. Lowering my weight, sealed the deal! I have been talking about you and your book to anyone who will listen...Thank you for all you’ve done and what you continue to do! You are changing lives for the better!
Missy Cramer
FatBurn Fix reader
Lost 20 lbs I could never shed
I love your Fatburn Fix! Has helped me so so much! I have had the dreaded weight all my life - 20 or so pounds I could never shed. I have lost that now. I only eat 2 meals a day lunch and dinner with a glass of milk or cappuccino around 4 to hold me over. No snacking and not bad oils. It has been the key to unlocking my fatburn. I work out in the am and believe I am burning fat for energy not from food!
Lauren Smith
I feel great
My waist is four inches smaller. I feel great and many of the minor aches and pains that I had (knees and lower back) are gone. Also, my muscle tone is amazing, even though I have not increased my workout routine.
Richard Janelle
Completed Dr Cate's online course

The go-to for strength and conditioning coaches
Whenever I advise my clients about eating to perform I go straight to what I have learned from Dr. Cate. Her book Deep Nutrition has become the go-to for strength and conditioning coaches across the country.
Kent Matthes
Major League Baseball Agent with WME Sports

Dismantles the lie
Dr. Cate dismantles the lie that seed oils are healthy, which may the biggest lie about nutrition and health because it’s so insidious.
Ken D Berry, MD
Author of Lies My Doctor Told Me

She knows the chemistry
Dr. Cate alerts us to the harms of seed oils and she’s convincing because she knows the chemistry better than anyone.
Dr. Drew Pinskey, MD
Globally recognized internal medicine and addiction medicine specialist, media personality, LoveLine Host, and New York Times bestselling author

No one is better at communicating nutritional truth
Dr. Cate has had the single greatest impact on how we talk to people about fueling for both performance or durability. While we all are a little unique, the foundational principles of human nutrition are immutable. If you are looking to create a more durable, resilient body, no one is better at communicating nutritional truth than Dr. Cate.
Dr. Kelly Starrett
Physiotherapist coach and New York Times and Wall Street Journal bestselling author

Highly recommend The Fatburn Fix
Dr. Shanahan has had a significant impact on my practice of medicine. I am known as a Low Carb Doctor, but I never really appreciated the negative effects of processed seed oils on the health of my patients. I highly recommend The Fatburn Fix to my patients and have a loaner copy in my waiting room. It is amazing how quickly blood sugars and overall health improves with cutting seed oils. It is not just about the carbs!
Dr. Brian Lenkzes, MD
CEO of LowCarbMD San Diego, co-host of Low Carb MD Podcast and host of Life's Best Medicine Podcast

Respected in the sports world
Dr. Cate reordered my diet when I was with the L.A. Lakers, and the benefits, for me personally, were felt immediately and have served me to this day. I’ve come to take real food so seriously I started a small family farm. I know of no M.D./nutritionist more respected in the sports world than Dr. Cate Shanahan.
Chris Kaman
NBA Player

Brought seed oil issue front and center
Cate brought the seed oil issue front and center. Healthy fats matter. So much so that I created an entire product line to swap out bad fats with good.
Mark Sisson
Founding Father of the Primal/Paleo Movement

Optimal health starts with food
If you want to understand how optimal health starts with food, start with Dr. Cate. Her book Deep Nutrition leaves you with an appreciation of the profound relationship between our genes and the planet, inspiring us to be good shepherds of both.
Dallas Hartwig
Attribution author of The Whole 30

Helped me with endurance
Deep Nutrition really helped me with endurance. I started to feel better as a player. I was able to run more, I was able to be more active …and I just decided to keep going with it to this day.
Dwight Howard
NBA Player

Silver bullet for me
Dr Cate’s teachings helped me lose 60 pounds like it was nothing. It was like a silver bullet for me.
Paul Grewal, MD
Dr Grewal Internal Medicine, MD, author of Genius Foods

Radically improve your health…
Dr. Shanahan has provided a solid reference that deserves a place in the library of anyone who is seriously interested in nutrition. Her perspective on the vital role that healthy fat has in our diet is novel and, if implemented, can radically improve your health.
Dr. Joseph Mercola
Author of Fat for Fuel and Founder of Mercola.com

Pull up a chair…
I have based my work on the idea that getting the right kinds of healthy fats into your body and avoiding the worst fats is essential to optimal health. I've interviewed dozens of the world's top experts about this, and I know of no one who speaks more eloquently on this topic than Dr Cate. If she’s talking fats, pull up a chair. Take notes.
Dave Asprey
Author of the Bulletproof Diet
The key to unlocking my fatburn
I love your Fatburn Fix! Has helped me so so much! I have had the dreaded weight all my life - 20 or so pounds I could never shed. I have lost that now. I only eat 2 meals a day lunch and dinner with a glass of milk or cappuccino around 4 to hold me over. No snacking and not bad oils. It has been the key to unlocking my fatburn.
Lauren Smith
Saved my life
I would like to thank you for literally saving my life. Back in February, I had to be hospitalized while on vacation in Phoenix with an A1C of 11% and had to start taking 2 types of insulin and 2 other meds. I read the Fatburn Fix in April, and followed the program to a tee, and I’m down by 15 pounds, 6.8 A1C, and only one once weekly diabetes medicine.
Leontyne Tompkins
> Tears of joy
I'm crying tears of joy and appreciation for all you've done for me and my health! Without Deep Nutrition and Fatburn Fix, I would literally still be in the vicious cycle I'd been fighting all my life! In a nutshell - I am no longer a compulsive overeating addict suffering under the crushing 'thumb' of all food and alcohol.
Penni Wicks
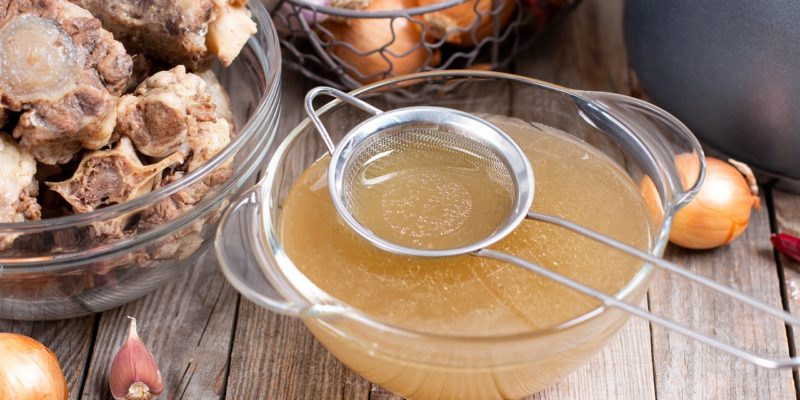
* soup bones and a joint bone (knee or other joint) w/ some meat on them (2-3 lbs), and not marrow bones
* 1 small can tomato puree
* celery, 5-6 stalks, rough cut
* onions, 2-3, rough cut
* carrots, 5 medium-large, rough cut
* 1-2 oz fresh parsley
* 2-3 bay leaves
* 1 tbsp fresh thyme
* 1 black peppercorns
* 2 or 3 cloves garlic
* red wine, nothing labeled “cooking wine,” inexpensive but drinkable
* sea salt, to taste
* 1-2 Tbsp olive oil
* flour, 1 tbsp
* cold, filtered water, about 3 gal
Directions:
Step 1) Lightly coat bones and meat trimmings with olive oil. Then rub a tablespoon of tomato paste mixed with one tablespoon of flour onto bones and roast alone in a large roasting pan for 30-40 mins at 400 F, or an hour at 350 F.
Step 2) Add lightly (olive) oiled mirepoix (rough cut onions, carrots, and celery) and continue roasting for another half hour (check color; caramelize, but don’t burn).
Step 4) Add the bones only to a large stock pot. Put the roasted vegetables aside and refrigerate. Add a cup of red wine, half a can of tomato puree, and enough cold water to cover bones plus one inch.
Step 5) Deglaze the hot roasting pan by pouring in some red wine or water to remove the nice caramelized drippings. (If you have the kind of pot you can put on the stovetop, you can get it a little hotter this way to aid deglazing.) Add this rich liquid (called “fond”) to the stock pot. That’s extra flavor!
Step 5) Heat stock at medium heat, stirring every few minutes and watching closely. Bring to a low, low simmer–but NEVER BOIL with the bones in the stock (as this extracts bitter proteins and clouds the finished stock).
Step 6) Low boil or steep at around 200 f. (just short of making boiling bubbles) for 12-24 hours, no more, no less. You can leave uncovered or partially covered. But never cover (as in seal, with no way for steam to escape) your stock when hot as doing so “sours” the stock. Every once in a while, use a slotted spoon to remove any scum that forms at the top of the liquid. That scum can make the stock bitter, so remove it every half an hour for the first few hours.
Step 7) For the last hour (or two) of low simmer, add those roasted veggies you put in the refrigerator. Throw the bay leaves and cloves in when you add the veggies. If your a fan of tomato (as I am), add another 12 ounce. can of tomato puree at this time if you’d like.
Step 8. For the last half an hour of the low simmer, toss in the fresh parsley (plenty, as in the full bunch) thyme (half as much as the parsley) and a flat tablespoon of peppercorns. (If you only have dry spices, you can steep them in the stock using one of those big tea balls, dangling it from the side of the pot by the chain a full hour before you take the stock off the heat.)
Step 9) Remove the dry herbs tea ball, if that’s what you used. Let the stock cool for a while on a cooling rack, until it’s cool enough to handle and strain. Strain through a fine wife mesh strainer into another big pot. (The bones are big and heavy, so you might want to remove those with big tongs or a solid slotted spoon before straining.) You can also use cheesecloth to strain, as Sean did so expertly when straining his chicken stock.
Step 10) Once the stock’s in the other pot, chill in an ice bath in the sink. Stir both the stock and the ice water to cool quickly. Once it’s at room temperature, put the stock into the refrigerator to chill.
Step 11) After it chills overnight, you’ll notice that the stock has formed a cap of fat on top. This can be as much as an inch thick. Remove this by cutting into quadrants with a knife and gently lifting it off of the gelatinous stock.
Step 12) If you like, reduce the stock by up to a half. Season with a little sea salt, but keep in mind that the more you further reduce, the saltier it will get–so under-season! You can always add more salt later. Now warm the stock for a couple minutes on the stove to make it easier to pour, and pour into little plastic or glass containers and store in the freezer for up to several months. I use painter’s tape to label the date of the stock, and the type of stock. Just remember to leave a little room to allow the freezing liquid to expand. Enjoy!
Related Posts
This Post Has 6 Comments
Note: Please do not share personal information with a medical question in our comment section. Comments containing this content will be deleted due to HIPAA regulations.
Please forgive if you mention this (I just focused on the end of the recipe before sending)….. what about keeping this congealed layer of fat for consumption ?
If you like the flavor that’s a perfectly fine thing to do!
Like, is there a recipe? Or only a video. I can’t load said video.
https://drcate.com/how-to-make-beef-bone-broth/ If its not working possibly related to my website undergoing some maintenance if the problem persists tomorrow please reply to this comment.
My wife and I are really trying to be more careful on what we’re eating in regards to hateful eight that you have referenced, however, its a bit of a tough battle in this small Wyoming town that I’m in as we very limited in grocery shopping options. I was introduced to you via a podcast that you were on with Gary Collins(TheSimpleLifeNow.com) and found your information very informative and have purchased your book(Fat Burn Fix). I have recently started seeing MCT oil listed as an ingredient on some items here and since it comes from the good oils you list( from what I’ve read) I wanted to make sure that this still falls into that good oil list?
HI please see the FAQ section here: https://drcate.com/list-of-good-fats-and-oils-versus-bad/ (Yes it’s a short answer but I’m trying to encourage folks to use the search feature, it’s a really good feature!)